

Table of Contents
- Getting started with Hurey and Xero
- How to connect Hurey to Xero
- How to map Hurey Employee Profiles to Xero Contacts
- How to Create a New Profile in Xero of an inactive employee in Hurey:
- How to Map an Inactive Employee in Hurey to an Existing Xero Profile.
- How to map Chart of Accounts in Hurey to Xero
- How to Create a New Account in Xero Chart of Accounts using Hurey
- How to Map an account in Hurey to an existing account in Xero
- How to map Hurey Journal Entries to Xero Manual Journals
- How to map reimbursements in Hurey to Xero Bills to Pay
Getting started with Hurey and Xero
Getting started with Hurey and Xero
- Employee Mapping
- Better Timekeeping
- Pay run Generation
- Disbursements Monitoring
- Accurate Journal Entries

Getting started with Hurey and Xero
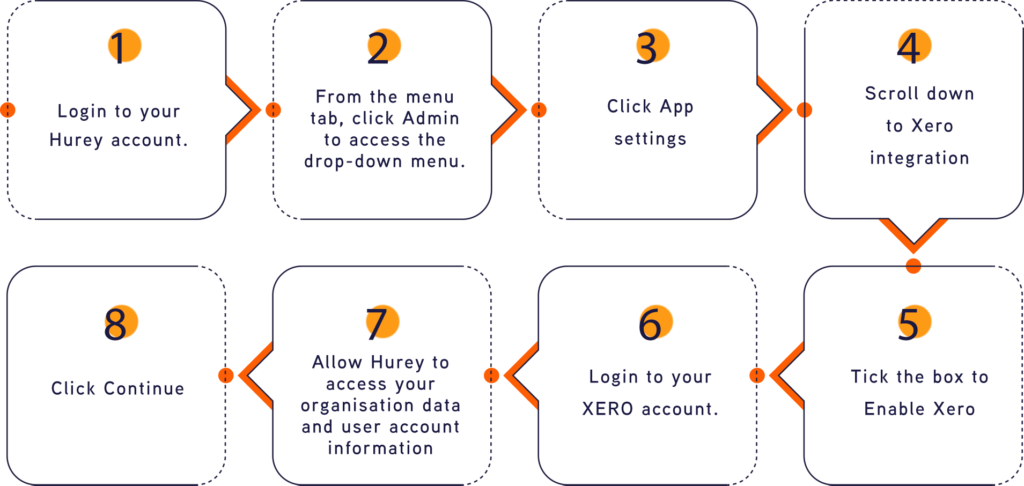
How to connect Hurey to Xero
Connect your Hurey app to your Xero account with just a few easy steps.
How to Create a New Profile in Xero of an inactive employee in Hurey:
- On the Employee Profiles list, select the inactive employees you want to create a Xero contact profile of. Inactive empoyees will be marked with a dash in a red box
- On the column for Xero, click the plus (+) sign in blue of the corresponding employee to access the drop-down list.
- Click Create New.
- A dialogue box will pop up to confirm creation of New Xero Employee profile for the inactive employee.
- Click Save to create the profile.
- The plus sign will now change to the name of the employee, indicating the profile has been created successfully in Xero.
Important information:
b. You can also map an inactive employee in Hurey to an existing Xero profile.
How to Map an Inactive Employee in Hurey to an Existing Xero Profile.
- On the Employee Profiles list, select the inactive employees you want to create a Xero contact profile of. Inactive employees will be marked with a dash in a red box
- On the column for Xero, click the plus (+) sign in blue for the corresponding name to access the drop-down list.
- Click Map Existing.
- Select the existing Xero profile where you wish to map the inactive employee from the drop-down list.
- Click Save to map the profile.
- The plus sign will now change to the name of the existing Xero profile where the inactive employee has been mapped to.
How to map Chart of Accounts in Hurey to Xero
- On the Hurey Menu tab, click Payroll to access drop-down list.
- Click Chart of Accounts to see the list of accounts in Hurey.
- Click the blue sync button on the far right of the screen to map Hurey Chart of Accounts to your Xero Chart of Accounts.
- A dialogue box will pop up asking if you wish to proceed. Click yes to continue mapping your Hurey Chart of Accounts to your Xero Chart of Accounts.
- A dialogue box will again pop up to confirm the successful mapping.
Important information:
c. Some accounts from your Hurey Chart of Accounts may not exist in your Xero Chart of Accounts. However, you have the option to Create a New Account or Map to an Existing account to Xero using Hurey.
How to Create a New Account in Xero Chart of Accounts using Hurey
- On the column for Xero, select the unmapped account. Unmapped accounts will have a “Account Not Unique” flag.
- Click Account Not Unique button to access the drop-down list.
- Choose Create New.
- A dialogue box will pop up to confirm creation of new account from Hurey to Xero.
- Click Save to create the account.
- The “Account Not Unique” flag will now change to the name of the new account, indicating it has been mapped successfully.
How to Map an account in Hurey to an existing account in Xero.
- On the column for Xero, select the unmapped account. Unmapped accounts will have a “Account Not Unique” flag.
- Click Account Not Unique button to access the drop-down list.
- Choose Create New.
- Click Map Existing.
- Select the existing Xero account where you wish to map the Hurey account from the drop-down list.
- Click Save to map the account.
- The “Account Not Unique” flag will now change to the name of the existing Xero account, where the Hurey account has been mapped to.
How to map Hurey Journal Entries to Xero Manual Journals
- On the Hurey Menu tab, click Payroll to access drop-down list.
- Select Pay Runs to access the list of available cut-off periods.
- Select the posted cut-off period by checking the “Coverage” column.
- Once the cute-off period has been identified, click the three dots/ellipses beside the “Payment Date” for the pay run. A drop-down list will appear.
- Select Journal Entries to access the accounting summary for the selected cut-off period.
- Click the blue Sync Button below the Journal Entry date, to map the Journal Entry to Xero
Important information:
a. Once the journal entry has been posted in Xero, you cannot “unpost” it.
b. When the journal entry has already been posted in Xero, you will no longer be able to edit it from Hurey. Should you wish to change/edit part of a journal entry, you have to manually edit in Xero.
How to map reimbursements in Hurey to Xero Bills to Pay
- On the Hurey Menu tab, click Payroll to access drop-down list.
- Click Disbursements to see the list of payables in Hurey.
- Select the Year from the drop-down list
- Select the Disbursement Provider from the drop-down list
- Select the Disbursement type
- Select “All”
- Click Search. All the recorded reimbursements for the year, as disbursed from the selected bank, including the account details and amount will be displayed.
- Click the blue Sync Button beside the orange refresh button next to “Disbursements” (above the drop-down for the Year)